Troubleshoot universe issues
YugabyteDB Anywhere (YBA) allows you to monitor and troubleshoot issues that arise from universes.
Use metrics
Monitor performance metrics for your universe to ensure the universe configuration matches its performance requirements using the universe Metrics page.
The Metrics page displays graphs representing information on operations, latency, and other parameters accumulated over time. By examining specific metrics, you can diagnose and troubleshoot issues.
You access metrics by navigating to Universes > Universe-Name > Metrics.
For information on the available metrics, refer to Performance metrics.
Use nodes status
You can check the status of the YB-Master and YB-TServer on each YugabyteDB node by navigating to Universes > Universe-Name > Nodes, as per the following illustration:
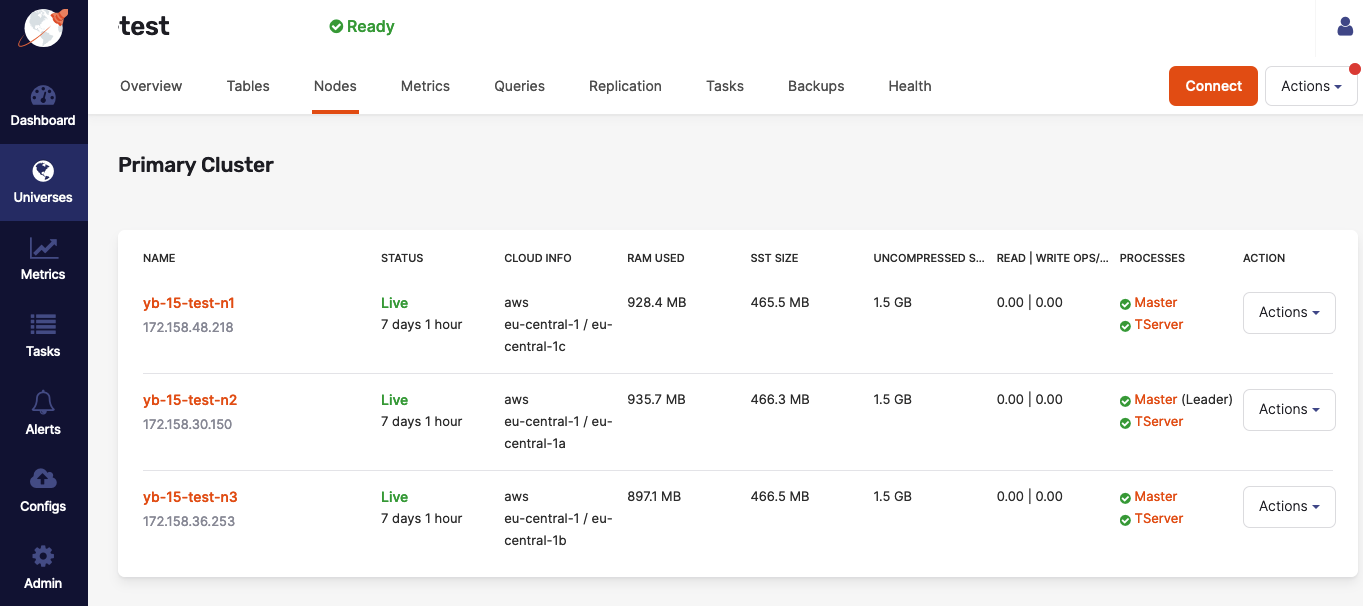
If issues arise, additional information about each master and YB-TServer is available on their respective Details pages, or by accessing <node_IP>:7000 for YB-Master servers and <node_IP>:9000 for YB-TServers (unless the configuration of your on-premises data center or cloud-provider account prevents the access, in which case you may consult Check YugabyteDB servers).
Check host resources on the nodes
To check host resources on your YugabyteDB nodes, run the following script, replacing the IP addresses with the IP addresses of your YugabyteDB nodes:
for IP in 10.1.13.150 10.1.13.151 10.1.13.152; \
do echo $IP; \
  ssh $IP \
    'echo -n "CPUs: ";cat /proc/cpuinfo | grep processor | wc -l; \
      echo -n "Mem: ";free -h | grep Mem | tr -s " " | cut -d" " -f 2; \
      echo -n "Disk: "; df -h / | grep -v Filesystem'; \
done
The output should look similar to the following:
10.1.12.103
CPUs: 72
Mem: 251G
Disk: /dev/sda2       160G   13G  148G   8% /
10.1.12.104
CPUs: 88
Mem: 251G
Disk: /dev/sda2       208G   22G  187G  11% /
10.1.12.105
CPUs: 88
Mem: 251G
Disk: /dev/sda2       208G  5.1G  203G   3% /
Troubleshoot universe creation
You typically create universes by navigating to Universes > Create universe > Primary cluster, as per the following illustration:
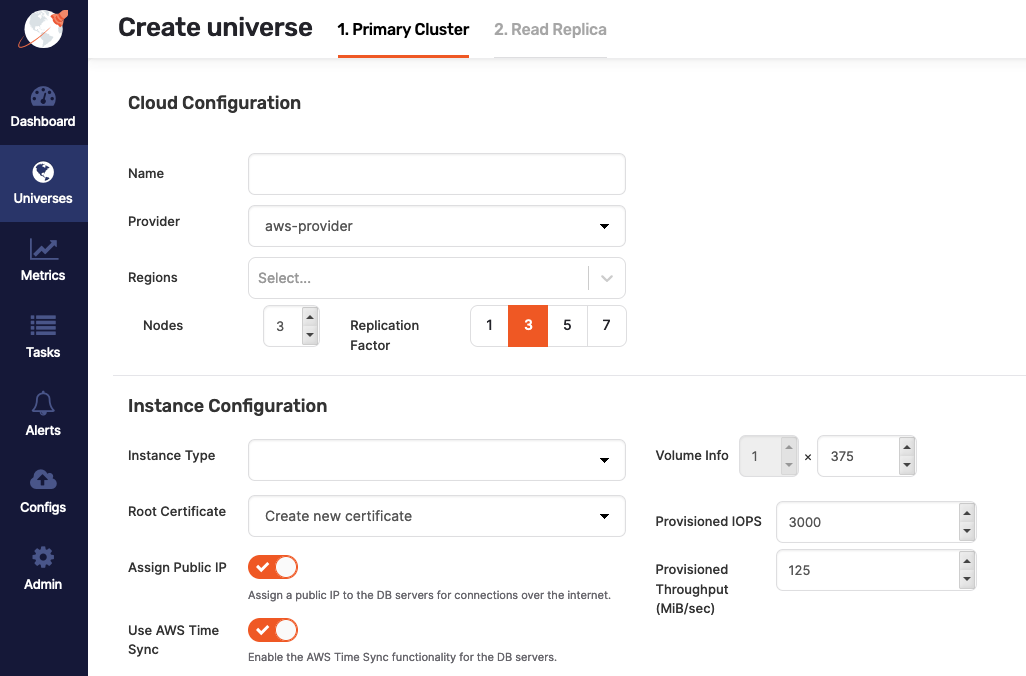
If you disable Assign Public IP during the universe creation, the process may fail under certain conditions, unless you either install the following packages on the machine image or make them available on an accessible package repository:
chrony, if you enabled Use Time Sync for the selected cloud provider.python-minimal, if YugabyteDB Anywhere is installed on Ubuntu 18.04.python-setuptools, if YugabyteDB Anywhere is installed on Ubuntu 18.04.python-sixorpython2-six(the Python2 version of Six).policycoreutils-python, if YugabyteDB Anywhere is installed on Oracle Linux 8.selinux-policymust be on an accessible package repository, if YugabyteDB Anywhere is installed on Oracle Linux 8.locales, if YugabyteDB Anywhere is installed on Ubuntu.
The preceding package requirements are applicable to YugabyteDB Anywhere v2.13.1.0.
If you are using YugabyteDB Anywhere v2.12 and disable Use Time Sync during the universe creation, you also need to install the ntpd package.
Use support bundles
A support bundle is an archive generated at a universe level, and also a silent collection of data from each node, even if file collection fails on certain components of nodes. It contains all the files required for diagnosing and troubleshooting a problem. The diagnostic information is provided by the following types of files:
- Application logs from YugabyteDB Anywhere.
- Universe logs, which are the YB-Master and YB-TServer log files from each node in the universe, as well as PostgreSQL logs available under the YB-TServer logs directory.
- Output files (
.out) files generated by the YB-Master and YB-TServer. - Error files (
.err) generated by the YB-Master and YB-TServer. - G-flag configuration files containing the flags set on the universe.
- Instance files that contain the metadata information from the YB-Master and YB-TServer.
- Consensus meta files containing consensus metadata information from the YB-Master and YB-TServer.
- Tablet meta files containing the tablet metadata from the YB-Master and YB-TServer.
Each component of the support bundle is scanned using a redacting service function to detect and redact passwords, keys, and other secrets before the bundle is generated.
The diagnostic information can be analyzed locally or the bundle can be forwarded to the Yugabyte Support team.
The focus is to ensure that support bundle generation is successful in most cases, regardless of any individual file collection failures.
You can create a support bundle as follows:
-
Open the universe that needs to be diagnosed and click Actions > Support Bundles.
-
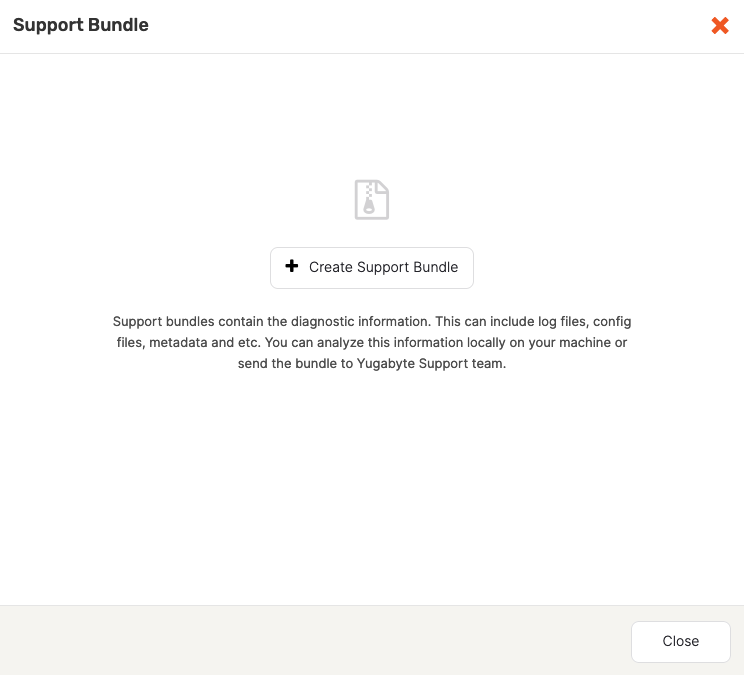
If the universe already has support bundles, they are displayed by the Support Bundle dialog. If there are no bundles for the universe, use the Support Bundles dialog to generate a bundle by clicking Create Support Bundle, as per the following illustration:
-
Select the date range and the types of files to be included in the bundle, as per the following illustration:
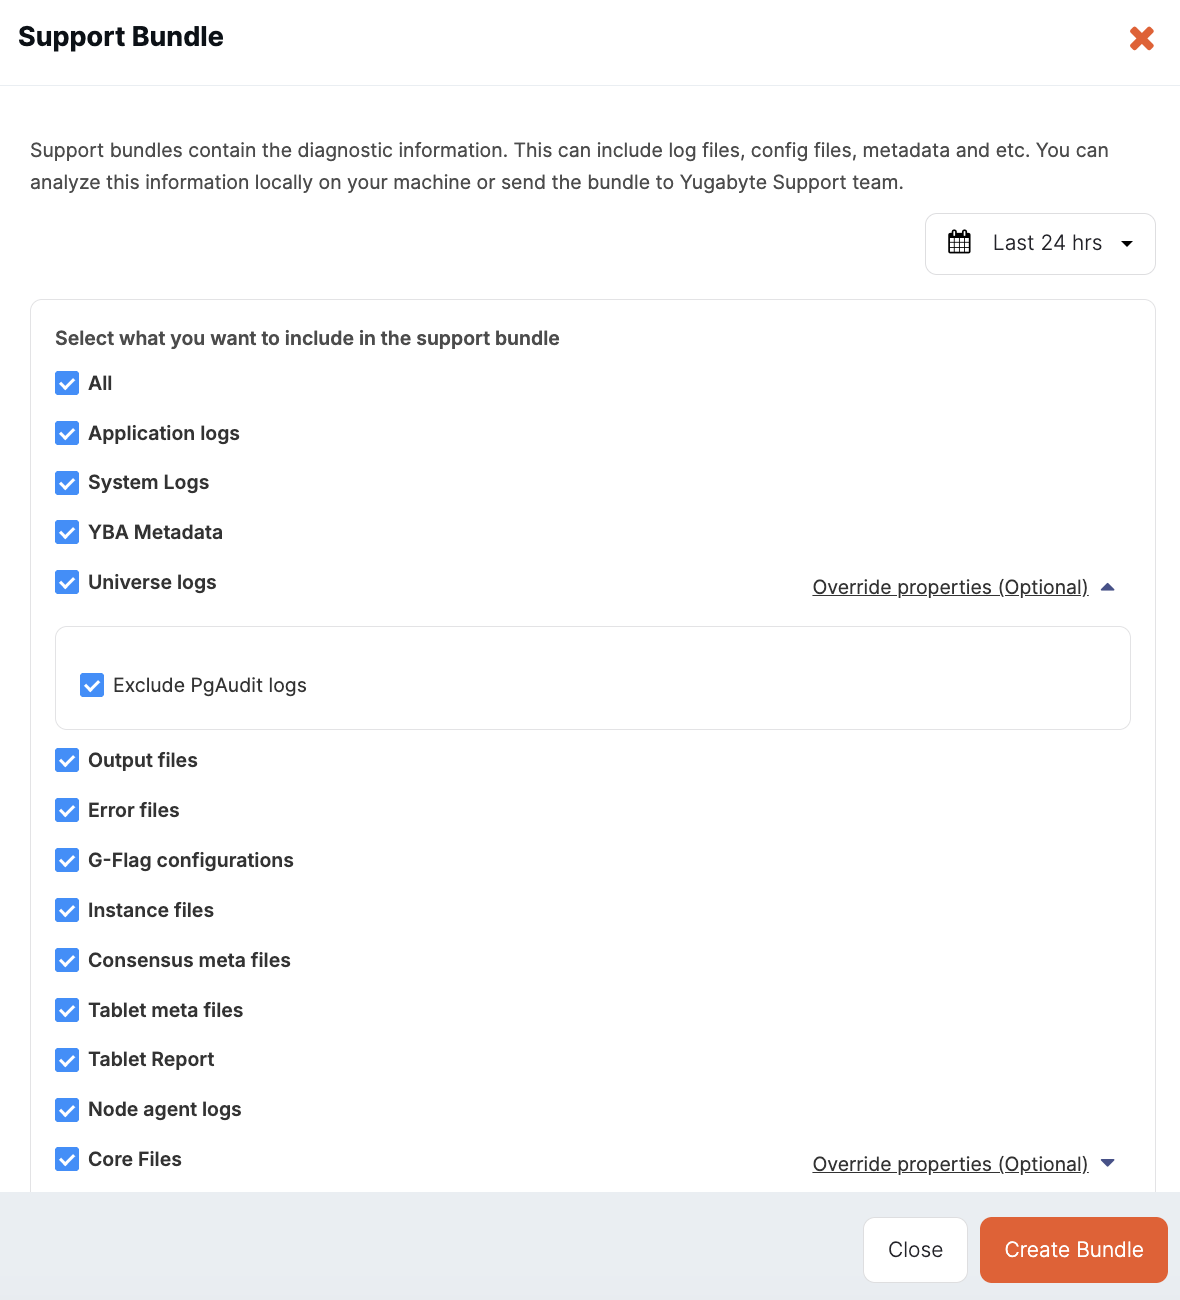
For information about the components, see Support bundle components.
-
Click Create Bundle.
YugabyteDB Anywhere starts collecting files from all the nodes in the cluster into an archive. Note that this process might take several minutes. When finished, the bundle's status is displayed as Ready, as per the following illustration:
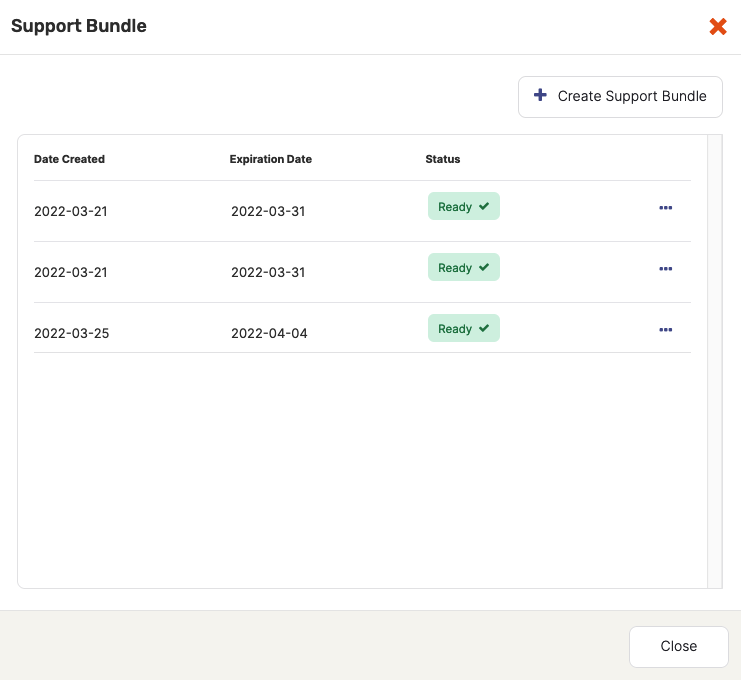
The Support Bundles dialog allows you to either download the bundle or delete it if it is no longer needed. By default, bundles expire after ten days to free up space.
Support bundle components
The following sections describe some of the file components of a support bundle.
Application logs
Logs generated by YBA.
System logs
Collects the /var/log/messages log files from all database nodes that fall within the support bundle's start and end date. This component is not applicable for Kubernetes universes.
YBA Metadata
This component collects a fingerprint of the YBA data. The metadata is collected at a customer level, rather than a global level (like pg_dump) to ensure multi-tenancy is respected going forward.
This metadata includes the following:
- Customer metadata
- Cloud providers metadata
- Universes metadata
- Users metadata
- Instance_type metadata (sizing info, cores)
- Customer_task table metadata
- Audit logs
- High availability metadata
- xCluster metadata
- Tasks metadata
An example of the YBA metadata directory structure is as follows:
support_bundle/
└── YBA/
    └── metadata/
        ├── customer.json
        ├── providers.json
        ├── universes.json
        └── users.json
Universe logs
Logs generated by YugabyteDB in the universe.
Output files
The .out files created in the YugabyteDB nodes.
Error files
The .err files created in the YugabyteDB nodes.
G-Flag configurations
Flags set on the universe. It is the server.conf file in the YugabyteDB nodes.
Instance files
Instance file in the /master and /tserver directories of YugabyteDB nodes.
Consensus meta files
Consensus-meta folder in the /master and /tserver directories of YugabyteDB nodes.
Tablet meta files
Tablet-meta folder in the /master and /tserver directories of YugabyteDB nodes.
Tablet report
A report that contains the locations, size, and attributes of every single tablet on a given YugabyteDB cluster. The report is generated by collecting tablet information from all TServers and the Master leader.
Node agent logs
Node agent logs generated in the YugabyteDB nodes (if node agent is enabled).
For more detailed logs, you can change node agent logging by setting the Node Agent Server Log Level Per Request Global Runtime Configuration option (config key yb.node_agent.server.request_log_level) to one of the following (v2025.2.3.0 and later):
- 0: DEBUG
- -1 (default) or 1: INFO
- 2: WARNING
- 4: ERROR
Refer to Manage runtime configuration settings. Note that only a Super Admin user can modify Global configuration settings.
Core Files
If you select the Core Files option (the default), the support bundle will include all core files generated within the specified date range.
When the Core Files option is selected, you can specify the following additional options:
-
Maximum number of recent core files: In some instances (for example, when a crashloop happens), there can be a large number of files. Specify the maximum number of files to include; YugabyteDB Anywhere collects the most recent files up to this value (default is 1).
-
Maximum core file size: Specify the maximum file size for core files to be collected, in bytes. Only core files smaller than the specified size are collected (default is 25000000000 bytes (25GB)).
You can disable core collection globally by setting the global runtime configuration flag yb.support_bundle.allow_cores_collection to false. You must be a Super Admin to set global runtime configuration flags.
Manifest file
The manifest.json file, which contains the parameters that were used to create the support bundle.
YB Controller logs
YBC logs generated in /controller/logs folder in the YugabyteDB nodes (if YB Controller is enabled).
Kubernetes info
This component exclusively includes metadata for Kubernetes-based universes. The detailed metadata list is as follows:
Note that YBA will only collect files if you have sufficient permissions to request the information. Otherwise, the file collection process will be skipped.
-
Cluster-wide information:
- Kubectl version
- Service account permissions
- Provider storage class info
-
Information collected in the YBA namespace:
- Events.yaml
- Pods.yaml
- Configmaps.yaml
- Services.yaml
-
Information collected from each YugabyteDB namespace in the cluster:
- Helm overrides used
- Events.yaml (Collect specific columns, sorted by time)
- Pods.yaml
- Configmaps.yaml
- Services.yaml
- Secrets.txt (Includes only secret names and not the actual value)
- Statefulsets.yaml
- Persistentvolumeclaims.yaml
Prometheus metrics
The Prometheus metrics for the selected universe. You can customize the timeframe and the metrics to collect.
You can include the following metrics with the support bundle:
- Master Export - YB-Master metrics.
- Node Export - System-level metrics for various hardware and OS parameters, such as CPU, memory, disk, and network usage, collected by Prometheus Node Exporter.
- Platform - YugabyteDB Anywhere metrics.
- Prometheus - metrics for Prometheus.
- TServer Export - YB-TServer metrics; these are scraped from the TServer processes, and mostly cover the storage layer.
- YSQL Export - YSQL query layer metrics.
- YCQL Export - YCQL query layer metrics.
The Prometheus metrics are stored in JSON files in the support_bundle/YBA/promdump directory.
You can also create "Custom Queries" by providing PromQL expressions; their results are stored in the support bundle under the corresponding folder name.
Collect node data
YugabyteDB Anywhere exposes REST APIs that run a short script on universe nodes to collect specified files or directories into archives you can download. This replaces manually SSHing into each node to run the same diagnostic command or gather the same paths.
This feature is only available only via the YugabyteDB Anywhere REST API or CLI.
Best practices
-
For routine diagnostics that do not require arbitrary commands, consider using support bundles first.
-
These APIs can read arbitrary files and run arbitrary commands on database nodes. They are intended for YugabyteDB Support and site reliability engineers during active troubleshooting. Before using them on a production universe, contact Yugabyte Support to confirm the approach and the safest way to invoke the APIs.
-
Keep the feature enabled only for the duration of an active troubleshooting session, and set it back to false when you are done.
-
Scripts should be short-lived, idempotent, and self-terminating. They run as the configured Linux user on each node; treat them as high-impact commands that can run concurrently on every targeted node. After execution has started on a node, it cannot be cancelled remotely from YBA. When you only need logs or configuration files, prefer the file-collection APIs over ad-hoc shell scripts (run-script) so size and depth limits apply and the operation stays auditable.
-
Use this feature only for ad-hoc troubleshooting. Do not embed it in automation, cron jobs, backup pipelines, or other recurring workflows.
Prerequisites
The All Nodes Script APIs are disabled by default. All run-script and file-collection API calls return HTTP 400 until the feature is enabled.
To enable All Nodes Script APIs, set the Enable All Nodes Script APIs Universe Runtime Configuration option (config key yb.node_script.enabled) to true. Refer to Manage runtime configuration settings.
In addition, you need the following:
- An API token for a user whose role includes the TROUBLESHOOT permission on the target universe, and the DEBUG permission to download file collections. For information on mapping roles and permissions to API access, see Manage access to YugabyteDB Anywhere.
- Shell access to the YugabyteDB Anywhere host for any operation that changes state on database nodes (run-script, creating or deleting a file collection, or downloading a collection with cleanup (see Limitations)).
Using the APIs
The run-script, file-collection create and delete operations, and the "cleanup after download" variant of the download operation are restricted to localhost access only; you can only invoke them from the YugabyteDB Anywhere host itself, and not from a remote client.
Per-request limits (timeouts, maximum parallel nodes, maximum file and total collection sizes, maximum directory depth, Linux user, and similar options) are defined in the YugabyteDB Anywhere OpenAPI specification for the runScript and createFileCollection operations. For details, see the YugabyteDB Anywhere REST API documentation.
Avoid long-running or non-idempotent scripts; remote cancellation is not available after a script starts on a node.
Invocations are recorded in the YBA audit log (target type Universe; actions include RunScript, CreateFileCollection, DownloadFileCollection, and DeleteFileCollection).
The implementation uses the existing Node Agent channel to database nodes; you do not need separate SSH credentials for these APIs when Node Agent is already in use.
Run a script on YugabyteDB nodes
Use the run-script API when you need the same shell commands executed on many universe nodes in one round trip, instead of SSHing to each host.
Endpoint to run a script:
POST /api/v2/customers/{cUUID}/universes/{uniUUID}/run-script
You can provide the script body or point to a script file that already exists on the YBA host. You can target all nodes, Masters only, TServers only, a specific cluster, or an explicit list of node names, and you can also cap parallel execution across nodes.
The response is synchronous and includes the stdout, exit code, and per-node success or failure summary.
Collect files, download, and clean up
-
Endpoint to create a collection:
POST /api/v2/customers/{cUUID}/universes/{uniUUID}/file-collectionsAccepts a list of file paths and/or directory paths to gather, along with size and depth limits. Files are packaged into a tar archive on each node. The response includes a
collection_uuidthat identifies the collection. -
Endpoint to download a collection:
GET /api/v2/customers/{cUUID}/universes/{uniUUID}/file-collections/{collectionUUID}/downloadStreams the per-node archives as a combined download.
-
Endpoint to delete a collection:
DELETE /api/v2/customers/{cUUID}/universes/{uniUUID}/file-collections/{collectionUUID}Removes staged archives from the database nodes and can optionally remove related data from YBA local storage.
Contact Yugabyte Support for invocation examples suited to your environment and issue.
Debug crashing YugabyteDB pods in Kubernetes
If the YugabyteDB pods of your universe are crashing, you can debug them with the help of following instructions.
Collect core dumps in Kubernetes environments
When dealing with Kubernetes-based installations of YugabyteDB Anywhere, you might need to retrieve core dump files in case of a crash in the Kubernetes pod. For more information, see Specify ulimit and remember the location of core dumps.
The process of collecting core dumps depends on the value of the sysctl kernel.core_pattern, which you can inspect in a Kubernetes pod or node by executing the following command:
cat /proc/sys/kernel/core_pattern
The value of core_pattern can be a literal path or it can contain a pipe symbol:
-
If the value of
core_patternis a literal path of the form/var/tmp/core.%p, cores are copied by the YugabyteDB node to a persistent volume directory that you can inspect using the following command:kubectl exec -it -n <namespace> <pod_name> -c yb-cleanup -- ls -lht /var/yugabyte/coresIn the preceding command, the
yb-cleanupcontainer of the node is used because the primary YB-Master or YB-TServer container may be in a crash loop.To copy a specific core dump file at this location, use the following kubectl
cpcommand:kubectl cp -n <namespace> -c yb-cleanup <yb_pod_name>:/var/yugabyte/cores/core.2334 /tmp/core.2334 -
If the value of
core_patterncontains a|pipe symbol (for example,|/usr/share/apport/apport -p%p -s%s -c%c -d%d -P%P -u%u -g%g -- %E), the core dump is being redirected to a specific collector on the underlying Kubernetes node, with the location depending on the exact collector. In this case, it is your responsibility to identify the location to which these files are written and retrieve them.
Use debug hooks with YugabyteDB in Kubernetes
You can add your own commands to pre- and post-debug hooks to troubleshoot crashing YB-Master or YB-TServer pods. These commands are run before the database process starts and after the database process terminates or crashes.
For example, to modify the debug hooks of a YB-Master, run following command:
kubectl edit configmap -n <namespace> ybuni1-asia-south1-a-lbrl-master-hooks
This opens the configmap YAML in your editor.
To add multiple commands to the pre-debug hook of yb-master-0, you can modify the yb-master-0-pre_debug_hook.sh key as follows:
apiVersion: v1
kind: ConfigMap
metadata:
  name: ybuni1-asia-south1-a-lbrl-master-hooks
data:
  yb-master-0-post_debug_hook.sh: 'echo ''hello-from-post'' '
  yb-master-0-pre_debug_hook.sh: |
    echo "Running the pre hook"
    du -sh /mnt/disk0/yb-data/
    sleep 5m
    # other commands here…
  yb-master-1-post_debug_hook.sh: 'echo ''hello-from-post'' '
  yb-master-1-pre_debug_hook.sh: 'echo ''hello-from-pre'' '
After you save the file, the updated commands will be executed on the next restart of yb-master-0.
You can run the following command to check the output of your debug hook:
kubectl logs -n <namespace> ybuni1-asia-south1-a-lbrl-yb-master-0 -c yb-master
Expect an output similar to the following:
...
2023-03-29 06:40:09,553 [INFO] k8s_parent.py: Executing operation: ybuni1-asia-south1-a-lbrl-yb-master-0_pre_debug_hook filepath: /opt/debug_hooks_config/yb-master-0-pre_debug_hook.sh
2023-03-29 06:45:09,627 [INFO] k8s_parent.py: Output from hook b'Running the pre hook\n44M\t/mnt/disk0/yb-data/\n'
Perform the follower lag check during upgrades
You can use the follower lag check to ensure that the YB-Master and YB-TServer process is caught up to its peers. To find this metric on Prometheus, execute the following:
max by (instance) (follower_lag_ms{instance='<ip>:<http_port>'})
- ip represents the YB-Master IP or the YB-TServer IP.
- http_port represents the HTTP port on which the YB-Master or YB-TServer is listening. The YB-Master default port is 7000 and the YB-TServer default port is 9000.
The result is the maximum follower lag, in milliseconds, of the most recent Prometheus of the specified YB-Master or YB-TServer process.
Typically, the maximum follower lag of a healthy universe is a few seconds at most. The following reasons may contribute to a significant increase in the follower lag, potentially reaching several minutes:
- Node issues, such as network problems between nodes, an unhealthy state of nodes, or inability of the node's YB-Master or YB-TServer process to properly serve requests. The lag usually persists until the issue is resolved.
- Issues during a rolling upgrade, when the YB-Master or YB-TServer process is stopped, upgrade on the associated process is performed, then the process is restarted. During the downtime, writes to the database continue to occur, but the associated YB-Master or YB-TServer are left behind. The lag gradually decreases after the YB-Master or YB-TServer has restarted and can serve requests again. However, if an upgrade is performed on a universe that is not in a healthy state to begin with (for example, a node is down or is experiencing an unexpected problem), a failure is likely to occur due to the follower lag threshold not being reached in the specified timeframe after the processes have restarted. Note that the default value for the follower lag threshold is 1 minute and the overall time allocated for the process to catch up is 15 minutes. To remedy the situation, perform the following:
- Bring the node back to a healthy state by stopping and restarting the node, or removing it and adding a new one.
- Ensure that the YB-Master and YB-TServer processes are running correctly on the node.
Run pre-checks before edit and upgrade operations
YugabyteDB Anywhere runs automated pre-checks before rolling upgrades and other cluster changes begin. The goal is to detect unhealthy nodes, unreachable management paths, or broken inter-node networking early, so rolling software upgrades and edit-cluster operations fail fast instead of stalling mid-task.
Many edit and upgrade dialogs include a Run Pre-check Only button. Use this to validate the planned change without applying it. The task appears in the universe Tasks list with a Validation prefix.
When a pre-check fails, the parent task is blocked in the pre-check phase. Task details and logs show which check failed and on which node. To view results, navigate to your universe Tasks tab, or refer to Monitor and manage universe tasks.
When pre-checks apply
Pre-checks are run as follows:
-
Rolling upgrades. This includes software upgrades, rollbacks, certificate rotation, VM image upgrades, GFlag changes, and other upgrade tasks that use rolling upgrade mode. If
skipNodeChecksistrueon the upgrade request, the checks are skipped. -
Edit cluster and universe operations on live nodes. This includes Edit Universe, Replace Node, and Decommission Node.
-
Universe creation and node provisioning, including inter-node DB port connectivity checks when new nodes are added.
Pre-checks run on the live subset of nodes in the planned change (nodes that are Live in the task parameters).
Pre-checks do not apply in the following cases:
- Comprehensive pre-checks (service liveness, command execution, DB port connectivity) do not apply to Kubernetes universes.
- Rolling-operation pre-checks (under-replicated tablets, nodes safe to take down, comprehensive pre-checks) do not apply to non-rolling upgrades.
- Nodes not in Live state. For rolling upgrades, if any node in the restart set is not Live, comprehensive pre-checks are skipped.
- Task retries. Comprehensive pre-checks run only on the first attempt of a task; retries skip them to avoid duplicate work.
Configure pre-checks
Most checks can be turned off or tuned using universe-scoped runtime configuration. Use these only when you understand the risk. For example, during a controlled maintenance window with manual validation.
The following universe-scoped runtime configuration parameters control comprehensive pre-checks:
| Flag | Details |
|---|---|
yb.checks.comprehensive_prechecks.enabled |
Default: true. When false, skips service liveness, command execution, and DB port connectivity checks that are gated on this flag. |
yb.checks.comprehensive_prechecks.check_service_liveness_timeout |
Default: 1m. Timeout for each liveness check subtask during comprehensive pre-checks. |
Refer to Manage runtime configuration settings for instructions on viewing and changing these parameters.
Pre-checks
(Rolling operations) Under-replicated tablets
During upgrades, YBA will not proceed if any tablets have fewer than the desired copies of tablets (typically the same as the overall replication factor (RF)).
Symptom (approximate sample error message)
CheckUnderReplicatedTablets, timing out after retrying 20 times for a duration of 10005ms,
greater than max time out of 10000ms. Under-replicated tablet size: 3. Failing....
Possible action/workaround
- Fix the root cause of under-replication if it is due to certain YB-TServers being down.
- Increase the timeout that YBA waits for under-replication to clear by increasing the value for the global runtime configuration flag
yb.checks.under_replicated_tablets.timeout. - If temporary unavailability during the upgrade is acceptable, disable this check briefly by turning off the global runtime configuration flag
yb.checks.under_replicated_tablets.enabledfor the universe.
(Rolling operations) Are nodes safe to take down?
During upgrades, YBA will not proceed if any tablets or YB-Masters have fewer than the desired copies of tablets (typically the same as the overall replication factor (RF)).
Symptom (approximate sample error message)
Nodes are not safe to take down:
TSERVERS: [10.1.1.1] have a problem: Server[YB Master - 10.1.1.1:7100] ILLEGAL_STATE[code 9]: 3 tablet(s) would be under-replicated.
Example: tablet c8bf6d0092004dee91c1df80e9f4223a would be under-replicated by 1 replicas
Possible action/workaround
- Fix the root cause of under-replication if it is due to certain YB-Masters or YB-TServers being down.
- Increase the timeout that YBA waits for under-replication to clear by increasing the value for the global runtime configuration flag
yb.checks.nodes_safe_to_take_down.timeout. - Allow for YB-TServers to lag more than the default compared to their peers to be considered healthy by changing the global runtime configuration flag
yb.checks.follower_lag.max_threshold. - If temporary unavailability during the rolling operation is acceptable, disable this check briefly by turning off the global runtime configuration flag
yb.checks.nodes_safe_to_take_down.enabledfor the universe. - To run the same check manually (for example, to verify specific nodes before starting a rolling operation), use the yb-admin command are_nodes_safe_to_take_down.
Leaderless tablets detected on the universe
YBA verifies that the universe is in a healthy state before starting operations. If any tablets do not have leaders, this check prevents further progress.
Symptom (approximate sample error message)
There are leaderless tablets: [b8a3e62d6868490abca0aba82e3477d7]
Possible action/workaround
- Fix the root cause of certain tablets having no leaders. You may need to contact Yugabyte Support.
- If the situation is temporary, you can raise the timeout for this check using the global runtime configuration flag
yb.checks.leaderless_tablets.timeout. - If the universe is in an unhealthy state and you are comfortable with the risk, turn off the check using the global runtime configuration flag
yb.checks.leaderless_tablets.enabled.
Universe consistency check
YBA verifies that the configuration of deployed YB-Masters and YB-TServers matches the YBA metadata (universe_details_json). In general, any discrepancy may indicate that some operations were performed on the YB-Masters/YB-TServers without YBA's knowledge and may need to be reconciled with the YBA metadata. This could happen due to:
- High availability (HA) was broken; in this case you would have two independent deployments of YBA, one of which could be stale because it was a standby and the last time it was restored was when it was promoted.
- Restoring a stale backup to a standby in HA.
- Manually restoring a stale backup using YBA Installer.
- During manual migration to a new host using YBA Installer.
Symptom (approximate sample error message)
No rows updated performing consistency check, stale universe metadata.
Possible action/workaround
- If you have a HA setup, check that you are running the task from the correct YBA.
- Fix the root cause of the inconsistency. You may need to contact Yugabyte Support.
- If the inconsistency was verified to be harmless, you can turn off the check using the global runtime configuration flag
yb.universe.consistency_check_enabled. Exercise caution before proceeding with such an inconsistency as it can have serious consequences.
Cluster consistency check
YBA verifies that the configuration of deployed YB-Masters and YB-TServers matches the YBA metadata (universe_details_json). In general, any discrepancy may indicate that some operations were performed on the YB-Masters/YB-TServers without YBA's knowledge and may need to be reconciled with the YBA metadata.
Symptom (approximate sample error message)
Unexpected TSERVER: 10.1.1.1, node with such ip is not present in cluster
Unexpected MASTER:, 10.1.1.1 node yb-node-1 is not marked as MASTER
Possible action/workaround
- Fix the root cause of the inconsistency. You may need to contact Yugabyte Support.
- If the inconsistency was verified to be harmless, you can turn off the check using the global runtime configuration flag
yb.task.verify_cluster_state. Exercise caution before proceeding with such an inconsistency as it can have serious consequences.
Follower lag check
After a node is restarted as part of a rolling operation, YBA verifies that the YB-Masters and YB-TServers catch up to their peers. If this does not happen in a specified duration, YBA aborts the rolling operation.
Symptom (approximate sample error message)
CheckFollowerLag, timing out after retrying 10 times for a duration of 10000ms
Possible action/workaround
- Fix any unhealthy nodes in the cluster or problematic network conditions that prevent the node from catching up to its peers.
- Allow a restarted node more time to catch up to its peers by increasing the timeout for the global runtime configuration flag
yb.checks.follower_lag.timeout. - If temporary unavailability is acceptable, disable this check briefly by turning off the global runtime configuration flag
yb.checks.follower_lag.enabled.
Service liveness check
Confirms YugabyteDB processes (and node agent, if present) respond on each node before YugabyteDB Anywhere restarts or reconfigures them.
Symptom (approximate sample error message)
Service(s) MASTER, TSERVER are not alive on node n1 (IP: 10.0.0.5)
Scope: YB-Master, YB-TServer, and node agent (when installed) on each node in the pre-check set.
Typical failure conditions
- YB-Master or YB-TServer process is down or not listening.
- Node agent is registered but not reachable.
- Liveness probe exceeds the configured timeout.
Possible action/workaround
- On the node (or via the YugabyteDB Anywhere UI), verify
yb-master,yb-tserver, and node-agent services are running. - Review the universe Nodes tab and node logs; fix crash loops or port conflicts.
- Retry the operation after processes are healthy.
Disable
Set yb.checks.comprehensive_prechecks.enabled to false on the universe.
Node command execution check
Verifies YugabyteDB Anywhere can run remote commands on the node via node agent (preferred) or SSH, before relying on that path for upgrade or edit scripts.
Symptom (approximate sample error message)
Cannot execute commands on node n1 (IP: 10.0.0.5). Node may be unreachable or SSH/node-agent connection may be unavailable.
Scope: Each live node in edit, replace, or decommission operations; each node in the rolling restart set for upgrades; and stop-node when comprehensive pre-checks are enabled.
Typical failure conditions
- Dead node.
- Node agent unreachable or not executing commands.
- SSH keys, bastion, or firewall blocking management access.
- Command times out (default 10 seconds per node).
Possible action/workaround
- Confirm node agent health on the node (
node-agentservice) and that the node appears correctly in YugabyteDB Anywhere. - If using SSH fallback, verify provider credentials, security groups, and SSH access from YugabyteDB Anywhere to the node.
- Fix networking or reinstall node agent if needed. Refer to Prepare to upgrade YugabyteDB Anywhere.
Disable
Set yb.checks.comprehensive_prechecks.enabled to false on the universe.
DB node port connectivity check
Validates TCP connectivity between database nodes on YB-Master RPC and YB-TServer RPC ports using a socket probe run from one node toward others. Checks both forward (source → target) and reverse (target → source) directions when IPs are available.
Symptom (approximate sample error message)
Port connectivity check failed (forward) from n1 (10.0.0.5) to n2 (10.0.0.6) on port 7100
Scope: Universe create, add node, and related provisioning or configure flows for nodes in eligible states, grouped by availability zone. Runs during universe creation and when adding or configuring nodes. It is not invoked by rolling upgrades or by edit-cluster operations on existing live nodes.
Typical failure conditions
- Security groups or firewall rules block RPC ports between availability zones or regions.
- Wrong private or public IP selection for cloud networking.
- Port filtered or unreachable (probe returns UNREACHABLE or FILTERED).
Possible action/workaround
- Ensure the YB-Master and YB-TServer RPC ports (defaults:
7100and9100; configurable per universe) are open between all database nodes in the universe, in both directions. - Confirm cloud private IP versus public IP settings match your network design.
Disable
Set yb.checks.comprehensive_prechecks.enabled to false on the universe. The same flag gates this check during provisioning.
Data directory disk space check
Ensures each targeted node has enough free space on the YugabyteDB data directory before running an operation that may write additional state to disk.
Symptom (approximate sample error message)
Node n1 has insufficient free disk space on data dir /mnt/d0: required 3221225472 bytes, available 1073741824 bytes
Scope: Runs as a pre-check for tasks that schedule it. Currently, this applies to the GFlags upgrade task.
Typical failure conditions
- Data directory filesystem nearly full.
- Wrong data directory path on the node.
Possible action/workaround
- Free disk space on the data volume or expand the disk.
- Confirm
data_dirand mount layout match universe configuration. - Retry the task that triggered the pre-check.
Disable
For upgrade tasks, set skipNodeChecks: true on the upgrade API request.
Duplicate instance check
Queries the cloud provider for each node and fails if more than one VM or instance matches the node's name (and node-uuid tag, when present). This guards against orphaned cloud resources left behind by interrupted tasks or manual changes.
Symptom (approximate sample error message)
Duplicate instances found for node myuniverse-n1 in universe <uuid>: [{id=i-abc123, private_ip=10.0.0.5, ...}, {id=i-def456, private_ip=10.0.0.9, ...}]
Scope: Public cloud providers (AWS, GCP, Azure) only; on-prem nodes are skipped. Runs for every node during edit-universe operations when comprehensive pre-checks are enabled.
Typical failure conditions
- A prior create, replace-node, or edit task provisioned a VM but did not terminate the old one.
- A stopped or orphaned VM shares the same
Nametag (AWS) or instance name as the live node. - Older universes without
node-uuidtags, where multiple VMs match on name alone.
Possible action/workaround
- In the cloud console, find instances matching the node name from the error (on AWS, search by the
Nametag). - Compare
private_ipvalues against the universe Nodes tab to identify the orphan. - Terminate or delete the extra instance, then retry the operation.
Disable
Set yb.checks.comprehensive_prechecks.enabled to false on the universe.